Wednesday, September 12, 2012

A Trio of Scarves

I have been knitting, a lot. 

I hurt my back/abdomen a few weeks ago and haven't really been able to do much. I was feeling very pathetic and useless, so I decided to check out my current knitting WIPS. 

I have an agreement with my knitting self. I am NOT allowed to start anymore knitting projects until I finish the WIPS I have. 

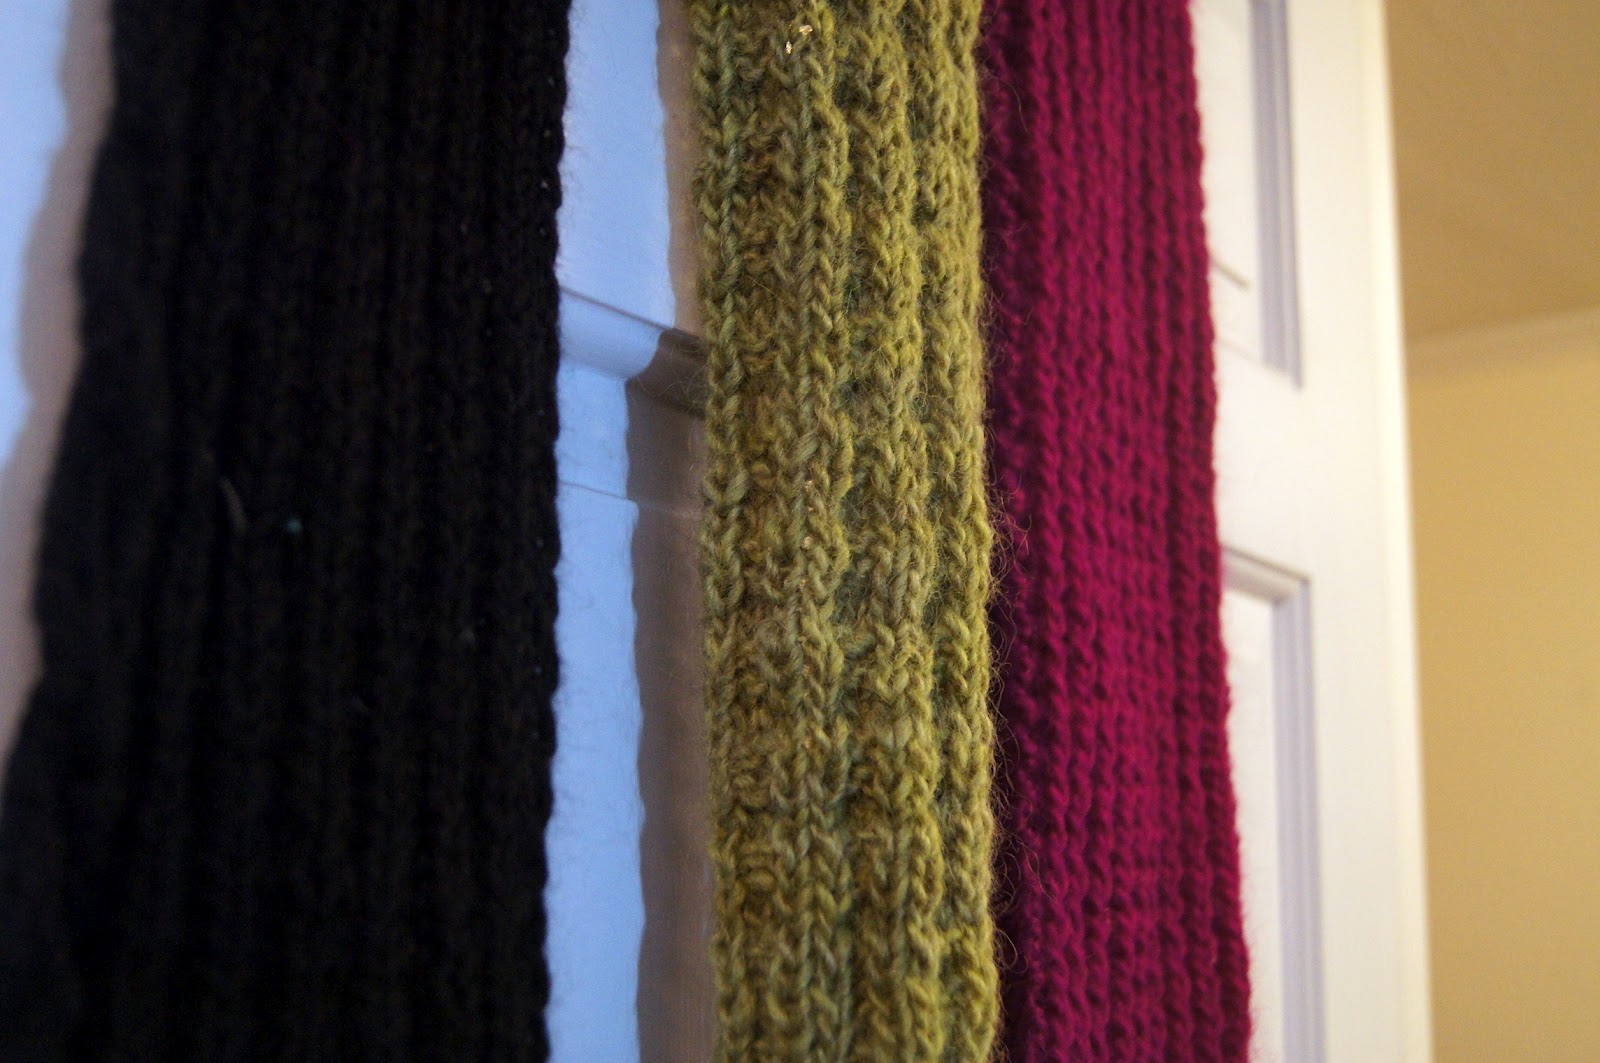
I grabbed these 3 already started scarves and finished them. 

The one on the left is a black cashmere 2x2 ribbed scarf, with a cable on the end. 

The middle scarf is a pea soup green wool waffle knit scarf. I believe I snagged up that yarn at the Big E a few years ago. 

The scarf on right is a magenta mistake stitch ribbed scarf. I have no idea what kind of yarn it is, someone probably gave it to me as a present.


As you can see in the pictures above, these scarves definitely needed to be blocked. Especially the green one, as it was completely curled up.

Confession ----- I have never blocked anything before. Mostly because I am too lazy. I have also never knit clothing before, so maybe that's why? Either way, I know blocking really gives hand knits a professional look so I had to stop being lazy and block these babies.

 (Before Blocking)

 (After Blocking)


Before blocking:


 During Blocking:


After Blocking:


Here is the Cashmere scarf. I didn't want to use my steam iron on it as I did the others. I wasn't sure what all of that heat would do to delicate cashmere.  I decided to opt for the pin, spray, let dry method that a lot of bloggers use for more delicate blocking.


I really wanted the finished scarf to accentuate the cabled edging.  I did go through all of the extra effort of adding that cabled edge, so I wanted it to really POP.


I kept the scarf at a consistent 7 inch width throughout the pinning process. 

The blocked, finished scarf actually only measured 6 inches. I lost an entire inch after I unpinned. Actually, I think that I lost more than that after I left the room. Booo.


Here is the before shot again:


 Here is the after:


Ok there it is! I think the blocking worked BEST on the 100% wool scarf. I really am in love with how it turned out. I guess I still need to work on my cashmere blocking skills. Does anyone have suggestions??? 

HOLLER!

Monday, September 3, 2012

A Favorite Dish {Tuna Tartare}

A very favorite dish of mine can be found at many restaurants, including The Cheesecake Factory and a local spot called Aperitivo (amazzzinnggg).

I love Tuna. I love it in sushi. I love it seared and served over rice. I love it seared and cooled over a salad. I love it in carpaccio. But, my heart skips a beat whenever I am served Tuna Tartare. 


I've ordered this dish almost every time I've seen it on a menu. I've almost always seen it served layered with avocado. Sometimes it has matchstick radishes, sometimes it has a layer of tempura (I don't like that), sometimes it has diced mango (love that).

My Husband's Uncle caught a BLUEFIN tuna while fishing off the coast of the cape. They know of my deep love for all things tuna, so they saved the belly (or Toro) for me. 

My Inlaws and Husband aren't die hard fans of eating raw tuna, like me. I thought that my favorite dish is a nice gateway dish to introduce them to tuna raw.


My Mother in Law found a great recipe for Tuna Tartare in Bon Appetit magazine. I stuck to the recipe when I made it, but I would definitely alter it a bit, because there were a few things that I wasn't a huge fan of. They mashed up 1 avocado with 1 tbsp of olive oil, and I didn't like that at all. I don't think that the avocado needs any oil, it is creamy and wonderful all on its own. They also only used 1 avocado for 4 people, but I used 2.


TUNA TARTARE RECIPE

Ingredients: 

Dressing
2 tsp finely grated lime zest
2 tbsp fresh lime juice
1 tbsp sugar
2 tbsp + 2 tsp soy sauce
2 tbsp champagne vinegar
2 tbsp grated ginger

Wonton Crisps
8 wonton wrappers, sliced diagonally into triangles
2 tbsp olive oil
2 tbsp sesame seed seasoning blend

Tuna
10 oz sushi grade tuna minced** (we had Bluefin Toro, the best of the best in the world. I am seriously spoiled)
1 tbsp olive oil
1 tsp minced chili (serrano, jalepeno)
1 tsp minced shallot
Kosher Salt
2 avocado, halved, pitted
4 radishes thinly sliced and then cut into matchsticks
A few drizzles of chili oil

**A good tip for mincing tuna is doing while it is a little frozen. I put our belly in the freezer for a half hour before you are ready to mince**


Recipe: 

Dressing
1. Combine the lime zest, lime juice, sugar, and 2 tbsp of water in a small saucepan
2. Bring them to a boil, and remove from heat
3. Cover and let cool completely
4. Strain through a mesh sieve into a medium bowl
5. Whisk in soy sauce, vinegar, and ginger until combined
6. Chill until ready to use

Wonton Crisps
1. Preheat oven to 350
2. Prepare a baking sheet with parchment
3. Put wontons on parchment
4. Brush face up side of wontons with olive oil
5. Sprinkle with sesame seed blend
6. Bake in oven for ~7 minutes, or until golden brown

Tuna
1. Toss minced tuna with olive oil, shallot, and chile
2. Scoop avocado flesh into a small bowl, with a pinch of kosher salt, and mash until there are only a few chunks. 
3. Divide avocado among plates
4. Top the avocado with the tuna mixture
5. Drizzle a tbsp of the dressing onto each of 4 stacks
6. Top with radishes
7. Drizzle with chile oil
8. Make plate look pretty by adding wontons
9. SERVE
10. I recommend putting the dressing on the table too, as people will likely want more.


I have had a very hurt back for almost 3 weeks now, and my Husband got me this gorgeous sunflower to brighten my day.

Naturally, glamor shots to follow.


Hope you enjoyed! This is another meal off of My Bucket List, another item added to My Finished Projects.   


HOLLER!

Sunday, August 26, 2012

Food Preserving {Roasted Plum Tomatoes}

I have been in food-mode lately. Well, let's be honest, I am pretty much always in food-mode. 


On week nights, I constantly struggle with my desire to cook a gourmet meal, and my lack of time to adequately do so. I need to complete meals from start to finish in about 1/3 of the time that it currently takes. I need to plan for easier meals during the week, so I can get all of my other crap done timely. Therefore, I am dabbling into thoughtfully preserving more. 


I know, people have been preserving forever and I am just getting started. But I'm only 26, so leave me alone. 

I follow Marisa's blog over at Food in Jars on a regular basis. I have merely tested the waters on canning, but I have gone full force into the other preserving methods she talks about, primarily freezing.

I am freezing everything these days. More importantly, I am trying to freeze foods in the serving sizes that we would actually use on recipes we frequently make:
  • Chopping and freezing our red peppers that we plucked from the garden in little baggies and I can saute them up for our quesadillas/fajitas.
  • Making eggplant cutlets and freezing in baggies, two ways. Large freezer baggies are for dinner sized portions of eggplant parm and smaller bags are for my husband to take to lunch.
  • We eat homemade pizzas probably once a month. I generally don't like sauce on my pizza, but husband does. So instead of letting the sauce go bad in the fridge until its time to make another pizza, I froze it in small tupperware containers (just enough for me to make him another 2 pizzas). 
I love love love tomatoes. We haven't really had an amazing tomato year, but when I saw this recipe for Slow Roasted Tomato Dip. I knew that I had to acquire some romas and make it, STAT.

Of course, before I could start with that recipe, I had to make her Slow Roasted Tomatoes. 

I went to the farmers market last week and got some gorgeous plum/roma tomatoes and followed her recipe to a T.


Here is roasting them after 5 hours at 200F. 


Here are these little gems after 12 hours in the oven. Don't they look amazing???!?!? In Marisa's recipe, she says they are so good that they barely last through the night. She was 100% correct. These little concentrated tomato bites were truly irresistible.


 As she does in her recipe, I put them roasted tomatoes onto a cookie sheet in the over to freeze. After that, I froze them in half-pint jars, in 2 cup increments (according to her recipe for the dip). 


Then I just had to make a batch of her dip for a BBQ we were having. I followed her recipe pretty closely. I did increase the amount of goat cheese in the dip to 1/2 cup, and in retrospect, I should have decreased the amount of garlic I used. I think that the recipe calls for 2 cloves of garlic, which I did use. However, my cloves could have been twice the size of hers. 

You know what else would be good? If I had roasted garlic on hand (freshly roasted or frozen). That would have been amazing in this dip. I love the depth of flavor and creaminess that roasted garlic adds.


Using my immersion blender, I busted up the tomatoes, then added the chevre, sour cream, garlic, and basil leaves plucked from the garden.


Unfortunately I don't have a picture of the finished product. It was devoured before I even got the chance. Trust me, it was amazing. I served it with red pepper strips and pretzels. 

MMMMmmm you know what it would be good with? Homemade sourdough pretzels!! Next time we have those, I will make another batch of this dip. 

Ok now I'm hungry. Hope you enjoyed. Check out my Bucket List and my Finished Projects.

HOLLER!