Showing posts with label Cotton Velveteen. Show all posts

Thursday, December 6, 2012

{Holiday Crafting} My Christmas Stocking!!

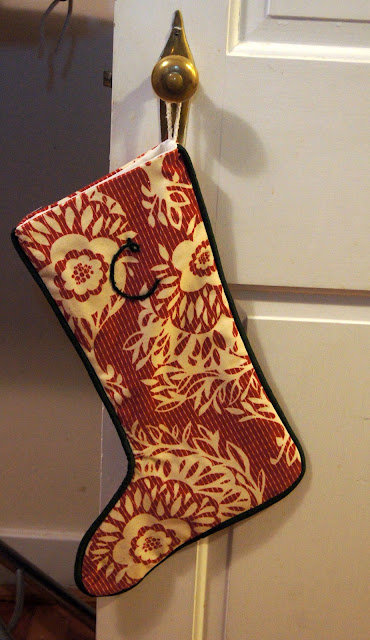
This week I have put the final touches on our Christmas decor, with the very last piece being My Very Own Christmas Stocking. Finally! 

In my last post, I showed you the Christmas Stocking I made and monogrammed for Chris. I made a matching stocking for myself, and am totally in love with it!


The only difference between the two stockings, aside from the obviously different toes, is that while making Chris's stocking, I didn't use bias strips to make the piping, and what a mistake that was! See Chris's stocking below, I wasn't overly impressed with how the toe came out.


I learned my lesson and used bias strips to make the piping for my stocking, and I am thankful because it would have been miserable to pipe otherwise.


Don't you love the pair? Can someone please pay me to sit home and make Christmas stockings all day??


HOLLER!

Tuesday, December 4, 2012

{Holiday Crafting} Monogrammed Christmas Stocking!

I am so excited to show you this project! 


If you've been following me for a while, you may have seen this Quilted Christmas Stocking that I made last Christmas. It was my first Christmas stocking, and when I pulled  it out of the Christmas bins this year, I really wasn't too fond of it. 

I actually don't think that I like the look of quilted things for my home, aside from Quilts of course.

Does anyone else feel that way? I think I'd rather have certain items in my home have a more formal look than quilted goods offer. 

Anyway, that meant that  I had to find a new Christmas Stocking and possibly tree skirt pattern this year. I saw this great pattern at the Sewing Shop and thought that I['d give it a go. Actually, I am teaching a few classes on this pattern.


I have been holding onto this Anna Maria Horner velveteen fabric for quite a while now, as I think that it SCREAMS Christmas to me, without being too theme-y. Look how great it looks paired with a dark green cotton sateen (I think) fabric that I decided to use as piping. 


You can see in the pattern above that there are two stocking options. Given that I want to use the same fabric for each stocking, with the same piping too, I decided that I would make the Elf Style stocking for me, and the other stocking for my Husband ("C"hris).


Ok so I knew that I would use Anna Maria's velveteen fabric as the base fabric, and I knew that I would use the gorgeous sateen fabric, but I thought that monogramming our initials onto the stocking would be perfecccctt. I am new to embroidery, so I did a few practice runs, naturally.


I definitely liked the second "C" better than the first. It was also SUPER easy and quick to make. Then I had to play  around with the scale and placement of the letter on the stocking. I wasn't sure if I wanted it big or small, in the center or near the top, or what. 


I am not sure how real embroiderers would go about making this project, but this is the only way that I could think of. 


I was also trying out with different thread colors. I was using Pearle Cotton in size 5. It has a gorgeous sheen which is perfect for this formal yet informal stocking. I ended up using the two green combo at the bottom. I wasn't sure that I wanted to introduce a new color to the mix.


Here are some progress pics:


I think that the C turned out pretty well!!


Then I made some piping -- I do think that I need to use bias strips to make the piping next time, be cause I am going around curves which were very tough.


 Here is the finished stocking!! Don't you love it? Now I have to make one for myself too...


All in all, this project was really really very easy. The embroidery was super simple and the stocking pattern was easy peasy. I do think that I changed the pattern to eliminate the cuff and other embellishments that I just don't think are my style.

HOLLER!

Saturday, October 22, 2011

Harvest Table Runner

I know that my love for Anna Maria Horner is very apparent from all of my blog posts and what not. But that love has deepened ever since I got a hold of her new cotton velveteen collection. This fabric is so luxurious! I knew that it was absolutely PERFECT for this project that I have been thinking of working on for a while now.


You can see the gorgeous sheen on this fabric. ooo lala.


I was playing around with the width. See, I wanted a wide and super-long table runner. This fabric is 54 inch wide fabric like most home decor weight fabric, about 10 inches wider than the standard quilting cotton. I only bought 1 yard (at $20/yard, eeeeek I know). So that meant that I had 36x54 fabric. Soooo given that I wanted this table runner to fit our table with both leaves in (that would make the table 96 inches long) I knew that I need to cut up the fabric into 3 pieces. So that left me with 3 18x36 inch strips.


Then I had to piece some backing for the runner. I just used some white and off-white fabric with a faint flower print on it. Very subtle. I started thinking that maybe this table runner was TOO long.... wouldn't even fit in our upstairs hallway! I also pieced a middle layer. At first I thought about using batting for the middle layer, but then I had that heat resistant fabric that you would typically use for potholders and ironing boards... so I used that.


Then I cut the ends to come to a point. I learned that the general rule to making the point look proportionate is dividing the width by 2. Therefore, 18/2 = 9 inches.


Then I piled all three layers together and started stitching. Notice that the velveteen and the backing were sewn right sides together so I can turn the table runner inside out.


After I sewed it all together, flipped it inside-out, and ironed it flat, it still didn't look "finished". I had the idea that maybe if I topstitched around the outside that might give it a more professional look. I used my 1/4 inch foot and topstitched around the entire outside. I am very happy with how it turned out!


Now, my favorite part. Time for some glamor shots.


Are you loving it as much as I am?

Another project checked off the bucket list!!! Wooohooo! Check out my flickr account and the sidebar on my blog for all of my finished projects. Enjoy!


Holler!