Showing posts with label holiday. Show all posts

Thursday, December 13, 2012

{Christmas Crafting} Mug Rugs & Silverware Sacks

Last night I just knocked 15, yes you heard that right, FIFTEEN items off of my Christmas Present Bucket List. 

Thank God, too. I was getting really worried that I'd never get started.  

First up was getting all of my coworker presents out of the way. I don't usually make Christmas gifts for everyone there, but I was feeling generous this year!! Also, I wanted to test out my new Silverware Sack pattern and I played around with a few different topstitching and enclosure methods. 


Then, for the coworkers that don't travel much, I am gifting mug rugs to all. 


And then ... they were added to the Christmas Present Pile. Hahah. We really need to wrap these babies.


How are you guys doing with your Christmas Crafting???? I am doing much better than I thought I'd be doing. Honestly, I am just proud that I actually made us Christmas Stockings, FINALLY.

HOLLER!

Thursday, December 6, 2012

{Holiday Crafting} My Christmas Stocking!!

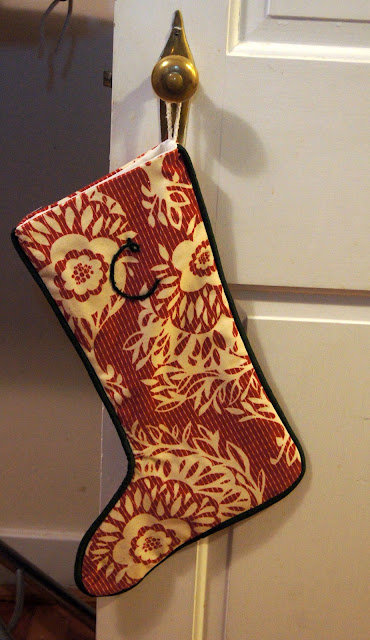
This week I have put the final touches on our Christmas decor, with the very last piece being My Very Own Christmas Stocking. Finally! 

In my last post, I showed you the Christmas Stocking I made and monogrammed for Chris. I made a matching stocking for myself, and am totally in love with it!


The only difference between the two stockings, aside from the obviously different toes, is that while making Chris's stocking, I didn't use bias strips to make the piping, and what a mistake that was! See Chris's stocking below, I wasn't overly impressed with how the toe came out.


I learned my lesson and used bias strips to make the piping for my stocking, and I am thankful because it would have been miserable to pipe otherwise.


Don't you love the pair? Can someone please pay me to sit home and make Christmas stockings all day??


HOLLER!

Tuesday, December 4, 2012

{Holiday Crafting} Monogrammed Christmas Stocking!

I am so excited to show you this project! 


If you've been following me for a while, you may have seen this Quilted Christmas Stocking that I made last Christmas. It was my first Christmas stocking, and when I pulled  it out of the Christmas bins this year, I really wasn't too fond of it. 

I actually don't think that I like the look of quilted things for my home, aside from Quilts of course.

Does anyone else feel that way? I think I'd rather have certain items in my home have a more formal look than quilted goods offer. 

Anyway, that meant that  I had to find a new Christmas Stocking and possibly tree skirt pattern this year. I saw this great pattern at the Sewing Shop and thought that I['d give it a go. Actually, I am teaching a few classes on this pattern.


I have been holding onto this Anna Maria Horner velveteen fabric for quite a while now, as I think that it SCREAMS Christmas to me, without being too theme-y. Look how great it looks paired with a dark green cotton sateen (I think) fabric that I decided to use as piping. 


You can see in the pattern above that there are two stocking options. Given that I want to use the same fabric for each stocking, with the same piping too, I decided that I would make the Elf Style stocking for me, and the other stocking for my Husband ("C"hris).


Ok so I knew that I would use Anna Maria's velveteen fabric as the base fabric, and I knew that I would use the gorgeous sateen fabric, but I thought that monogramming our initials onto the stocking would be perfecccctt. I am new to embroidery, so I did a few practice runs, naturally.


I definitely liked the second "C" better than the first. It was also SUPER easy and quick to make. Then I had to play  around with the scale and placement of the letter on the stocking. I wasn't sure if I wanted it big or small, in the center or near the top, or what. 


I am not sure how real embroiderers would go about making this project, but this is the only way that I could think of. 


I was also trying out with different thread colors. I was using Pearle Cotton in size 5. It has a gorgeous sheen which is perfect for this formal yet informal stocking. I ended up using the two green combo at the bottom. I wasn't sure that I wanted to introduce a new color to the mix.


Here are some progress pics:


I think that the C turned out pretty well!!


Then I made some piping -- I do think that I need to use bias strips to make the piping next time, be cause I am going around curves which were very tough.


 Here is the finished stocking!! Don't you love it? Now I have to make one for myself too...


All in all, this project was really really very easy. The embroidery was super simple and the stocking pattern was easy peasy. I do think that I changed the pattern to eliminate the cuff and other embellishments that I just don't think are my style.

HOLLER!
Saturday, December 1, 2012

{From Scratch Club} Embroidered Jar Lids

Hiii! 

As you know, I am a new contributor to the From Scratch Club blog. My craft post this month was a pattern for Embroidered Jar Lids for mason jar gifting. Check it out!!


HOLLER!

Sunday, November 25, 2012

{Holiday Gifting} Ice Cream Toppings

There is a certain someone in our family that LOVES ice cream. I thought that it might be a cute idea to gift this certain someone with a special, personalized gift this Christmas. 


I had the idea of putting a few favorite candies, crushed up, in jars as handy dandy ice cream toppings. 

First things first though ... I gathered up some supplies for the project. Pretty pens, scrapbook paper, yarns, fabric, candy, and JARS.


Then I got to the candy cutting, chopping, and smashing. I used a combination of methods, depending on the candy. I chopped up the Heath Bar and Reeses, and then smashed the other candies with a mallet. 


Then I had to figure out how I'd package the goodies. I knew that I wanted to use jars because I am on quite the jar kick lately. Naturally, I searched the one and only, Pinterest for some inspiration.

s'more gift jar 

Gingerbread gift jars x 

 mix-match-gift granola in weck jar

jars jars jars


I decided that I didn't want to buy anything or get to fussy. I grabbed some fabric and yarn and got going. I cut (4) 8 inch squares of fabric and hemmed the fabric so that there were not any frayed edged.


Then I grabbed some nice pens, cardstock/scrapbook paper, and scissors and experimented with different labeling techniques.


It took a little trial and error, but I finally came up with a method that seemed to work well for this project, and maybe future ones as well. 


1) Place the square piece centered on top of the jar


2) Get some tape handy and tape down all four FLAT EDGES loosely to the sides of the jar


3) Then I fingerpressed the corners, very simply


4) Putting it all together...I played around with a few different labels and I really like the tag look the best. It also allows for a perfect place for hole-punching.


It was also really easy to wrap the tag and yarn around the jar now that you've pressed those edges. Just start with the 1 corner in the back and work your way around.


TADA!!


Are you jarring any presents for Christmas???

HOLLER!