I have been really intimidated by several projects/skills, and in making this purse / crossbody bag, I conquered several demons.
2) Using Piping! I've never used piping before (that I can remember). I wish I started using it sooner, it is so easy to use!
3) Using hardware (i.e. buckles, etc). Those of you that know me, know that I REALLY hate repeating myself, doing things twice, doing things over again, etc. I am THAT PERSON that carries all of her grocery bags in 1 trip. I have never and will never take 2 trips. Those of you that know me, also know that I make wicked stupid mistakes. WICKED STUPID. That all being said, the thought of measuring, cutting, placing, and then stitching on a buckle so well that it could weather any storm, only to find out that I made some stupid mistake and I'd have to re-do the whole thing really wasn't my cup of tea. But, then again, this blog is called CRAFT MY LIFE AWAY, so I had to slay these demons.
This is the pattern I used. I wanted to make the "Carmel Plus Bag". Naturally, I had some alterations. I wanted to use Nancy's pattern as a base, but didn't really like the look of her bag at all.
- I wanted to eliminate the front pocket.
- Instead of using her magnet snap enclosure, I wanted to do some type of thing on the front, wasn't exactly sure what.
- I wanted a longer strap so instead of a should bag it was a crossbody bag.
(Bad pic, I know. But this is what I envisioned from the beginning.)
These are the fabrics I decided to work with. I wanted a somewhat summery bag with a sort of hippie feel. I'm not sure why, but I was just in the mood for something out of my ordinary style. I had a lot of trouble deciding between the fabrics. I really liked the aqua color better. HOWEVER, I determined that white lining was probably not such a good idea, and therefore I would eliminate the white, and using the solid color as the liner as well. Unfortunately, there wasn't enough aqua to go around, and my wonderful loving caring husband has put a permanent ban on buying anymore fabric (can you really blame him?). Thus, the rust color won the battle.
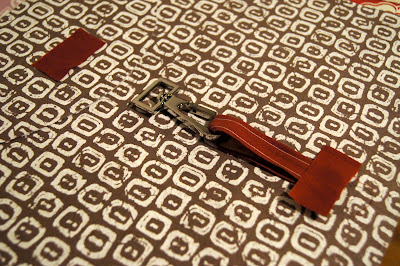
FRONT BAG CLOSURE: After chomping into all of my fabric, tracing it onto the templates provided with the pattern, and interfacing all of the pieces, I literally had NO plan for how I was going to attach all of the hardware. Again, I was straying from the original pattern, which left me a little clueless. I really had to think this one out because I knew that I could make a stupid mistake like attaching things in the wrong order if I didn't give the whole closure thing enough thought. Thus, lots of pictures related to getting the closure right. Measuring and playing around with it, and then more measuring and then more measuring and then more playing around with it. I tried to take pictures of all of the different options.
SHOULDER STRAP: For the shoulder strap, I tried out a few different options for attaching the strap to the bag, as well as many different strap widths and lengths. I ended up using the main fabric, the accent fabric, as well as a satin ribbon. I thought that the end result look was fantastic, but given that these pieces were interfaced as well, there is no way that i will ever want to go through this whole process again, like EVER. I'd rather just use the main fabric and once thicker ribbon, maybe Grosgrain?
THE FLAP: This was my first use of piping. I bought the piping foot for my Bernina and it really helped out! It was so much easier than I anticipated. I guess I could have used a zipper foot, but I had a credit at my local dealer, so I thought that I might as well invest in the foot.
CLOSURE & FLAP: I couldn't really finish the portion of the closure that was on the body of the bag until I had a finished size for the flap. I wanted to leave enough slack on the closure so that I could pack it full of stuff. I really just 100% guessed and was hoping that it would all work out in the end.
BODY: I attached the piping to the body of the bag. Again, so EASY!
SHOULD STRAP: I attached the hardware for the shoulder strap according to the instructions.
FLAP: I attached the flap to the bag.
FINISHED SUMMER CROSSBODY BAG: Overall, I am very happy with how it turned out. I conquered several demons. I didn't make any ridiculous mistakes. Although I don't think the bag is exactly my style, I think it is exactly what I intended on making. My workmanship impressed even me! And guess what? I make a BAG!
I'll leave you with one last shot:
I hope that you enjoyed the play by play. I will consider this another project checked off of My Bucket List. You can now find it on My Finished Projects page. Also, feel free to check out my Flickr Page.
HOLLER!


I LOVE the hardware you used on this bag - super cute...please quit your job and open a crafting store so you can sell your creations, k thanks.
ReplyDelete